Shrimp tanks are a fun alternative to fish tanks, and are very simple to set up. They’re also very low maintenance.
Which type of shrimp?
Before you start building your shrimp tank, you’ll need to decide which species of shrimp you want to keep.
There are two main groups of freshwater shrimp:
- Hard water - Neocaridina or Cherry shrimp
- Soft water - Caridina or Bee shrimp
These two types have slightly different preferences for their water parameters. It’ll be much easier to plan ahead for this, than try to correct it later.
For beginners, Neocaridina or Cherry shrimp are probably the best choice. They’re a bit tougher and can tolerate a wider range of water parameters.
What difference does it make?
Caridina shrimp thrive in acidic water with a fairly low pH, but Neocaridina have a slight preference for higher pH levels.
Caridina shrimp also need a low carbonate hardness (KH) level in the water, or they’ll have trouble molting safely.
Cherry shrimp are much more tolerant of higher KH water and happy in a wider range.
What do you need for a shrimp tank?
- An aquarium
- Some substrate
- Some water, either tap water or remineralized
- Some hardscape materials, e.g. rocks, driftwood
- A shrimp safe filter
Aquarium shapes & sizes
Dwarf shrimp, as suggested by their name, are tiny and don’t need a big aquarium.
You can use almost anything as a tank as long as it holds at least 1 gallon of water. Vases, fishbowls, and plastic tubs have all been used by shrimp keepers before.
Which substrate should you use?
There are quite a few options for shrimp tank substrates. The sensible route is to make sure your most sensitive species will be happy.
Caridina shrimp thrive with a buffering substrate, as they don’t like high KH water. This will help prevent pH swings in their water.
Neocaridinas can also live in tanks with these substrates, but they don’t need it.
For a mixed species tank, you can use an inert substrate like gravel or sand too.
What type of water is best?
Once you’ve decided on a substrate, you’ll know what type of water you need.
You should only ever use remineralized water with buffering substrates, or you’ll wear it out faster.
Tap water often has a fairly high KH level, and any active substrate will work hard to pull this out of the water. Using tap water with these types of substrate can make them only last for a few months before they need replacing.
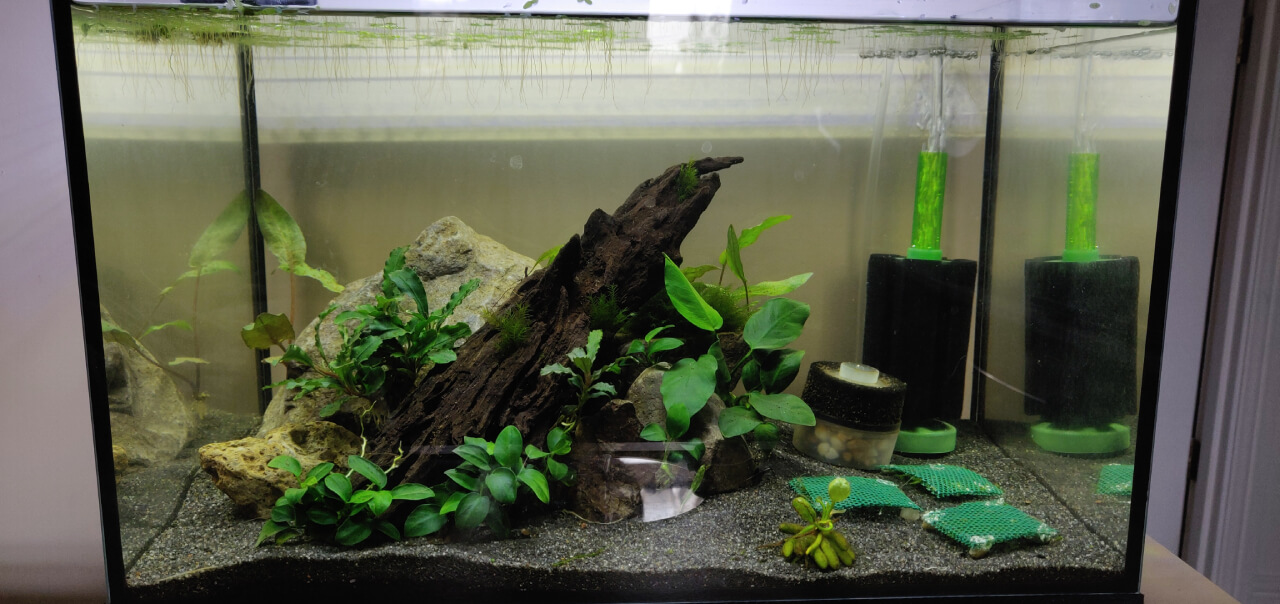
Hardscape materials
Hardscape pieces like rocks and driftwood are incredibly important in shrimp tanks.

Why do shrimp love rocks and wood?
- They make lots of hiding spots
- They provide surface area for biofilm to grow
It’s completely normal for shrimp to spend a lot of their time hiding.
After molting, they feel vulnerable and seek shelter. Females will also try and get some peace from the males by hiding for a while.
The extra surface area is great for growing biofilm and algae to eat.
Having lots of background biofilm spread around the tank will make your shrimp much happier, and help baby shrimp to survive.
Be careful when choosing rocks, though, as some types can cause your KH to increase.
Shrimp safe filter
Choose an aquarium filter that’s safe for shrimp.
Sponge filters are the most popular choice in shrimp tanks, they’re small and low maintenance. You only need to clean the sponge every few months or so.
Optional extras
- Light: you might want to use an aquarium light if you’re trying to grow a planted tank
- Heater: using a heater can help keep the parameters stable, but you don’t really need one
- Food: a mature tank with biofilm should keep your colony well fed, but it’s a good idea to have some extra shrimp food around
How to set up your shrimp tank
The basic steps to get your shrimp tank built are:
- Add the substrate
- Add a filter
- Build your hardscape
- Fill it with water
- Cycle the tank and let it mature
- Introduce your shrimp
1. Add the substrate
Some types of substrate might need to be rinsed before you use it, otherwise your water will be cloudy for a while.
You don’t want to rinse a buffering substrate, though.
Pour your substrate into the tank until it’s between 1-3 inches deep.
Going too deep can lead to anaerobic pockets of gas building up, and cause problems later.
2. Add the filter
Decide where you’d like your filter to be before you plan your hardscape layout.
It’s pretty frustrating building the perfect layout of rocks and driftwood, only to realize there’s no room for your filter anywhere.
Sponge filters can either sit on the substrate, or stick to the glass walls with suction cups, so you’ve got some flexibility.
3. Building the hardscape
Now for the fun part.
Build up your rocks and wood into a structure that looks interesting in your tank.

There’s no right or wrong way to do this, but here are a few tips:
- Give your shrimp room to hide with caves and gaps
- Use the full width and height of your tank
- This will provide the most amount of surface area for biofilm to grow
- Keep a gap between the hardscape and glass walls, so you can easily clean off algae
- Think about plant positions, what will be hidden?
- Think about water flow / movement
- If you’re using a Hang on Back filter, what will the water hit when it comes back into the tank?
4. Get it wet
Prepare enough water to fill the tank, and maybe a little spare for water changes.
Pour the water over your hardscape to avoid moving the substrate around too much.
You can also put a small plate on the substrate and pour on to that to baffle the flow a bit.
5. Cycle and mature the tank
The most important step for setting up a shrimp tank, is to make sure it’s cycled properly.
Unfortunately, many first time shrimp keepers add their shrimp to a fresh tank and get lots of deaths.
This is usually caused by ammonia. Waste breaks down into ammonia, and this is highly toxic to shrimp, too much can be deadly.
A fully cycled tank will be able to convert any ammonia in the water into safe elements, before it reaches dangerous levels.
This conversion is done by beneficial bacteria in your tank, and most of it will live in your filter sponge. Giving this bacteria enough time to build up a healthy colony will keep your shrimp safe and healthy.
Don’t rush into adding your shrimp as soon as your cycle is complete. Let the tank mature for a while.
Maturing simply means letting algae and biofilm grow wild for a bit. This will make sure the shrimp have plenty to eat, and gives a great head start for baby shrimp too.
Floating plants are super helpful when cycling a tank, as they absorb the nitrates before algae can. They won’t completely stop algae growing, but they can slow it down and help balance the ecosystem.
6. Add the shrimp
After roughly 6-8 weeks, your tank should be fully cycled and have a healthy backlog of biofilm.
It’s finally time to add your shrimp.
As shrimp are highly sensitive to changes in their water parameters, you should use the drip acclimation method.
After they’ve adjusted to the new water for about an hour, you can net them into their new home.
They’ll probably spend their first few hours to days hiding and exploring the tank. Give them some time to settle in.
Maintenance
Now you’ve got your very own shrimp tank running, you’ll have to do some simple maintenance every so often.
- Feed your shrimp every few days
- Do a water change every two weeks
- Clean the sponge filter every few months
- Vacuum the substrate when it looks dirty