Do you need a feeding dish?
No, feeding your shrimp in a dish is completely optional.
They’re normally used for holding solid foods that can break down, such as algae wafers or shrimp pellets. You could try putting something like bee pollen in the fish, but it will probably end up making a bit of a mess anyway.
If it’s optional, why should you bother with using a feeding dish? What are the benefits?
Benefits
- Helps prevent overfeeding
- Keeps the substrate cleaner
- Gives you a good view to inspect your shrimp colony
Prevent overfeeding
By placing your shrimp’s food in a specific spot, and with a clear view, you’ll easily be able to tell how much food is left.
You’ll also be able to get a rough idea of how long it takes your shrimp colony to eat the amount you added. As a rule of thumb, most foods should only be left in the tank for up to 3 hours. After this point they can start to break down, or rot, and begin affecting your water quality.
There are some exceptions to this, such as snowflake food, which can be left in the tank until it’s been eaten entirely, perhaps a week later.
Once you’ve given your colony enough time to enjoy their meal, you can simply lift out the feeding dish and throw out the leftovers. Be careful to check for any snails that didn’t manage to escape in time.
Clean substrate
Using a glass dish to hold the shrimp food will reduce the amount of mess that would normally end up on your substrate. You could do a gravel vac over the substrate every so often to keep this under control.
Tiny pieces of a shrimp pellet could also fall between the gaps in your gravel. This then becomes a tasty meal for the clean-up crew in your tank, specifically detritus worms.
Detritus worms, as their name suggests, will break down all the detritus (waste) and leftovers into more useful components.

Planted tanks can benefit from these extra nutrients in the water, but you need to be careful to keep the nitrate level low enough to be safe for your shrimp. Aiming for a nitrate level of no higher than 20ppm should be fine.
However, if you consistently overfeed your tanks with more than the detritus worms can process, you risk a Planaria infestation. Planaria are small worms with a diamond-shaped head that will normally hide in your substrate, and can be harmful in a shrimp tank.
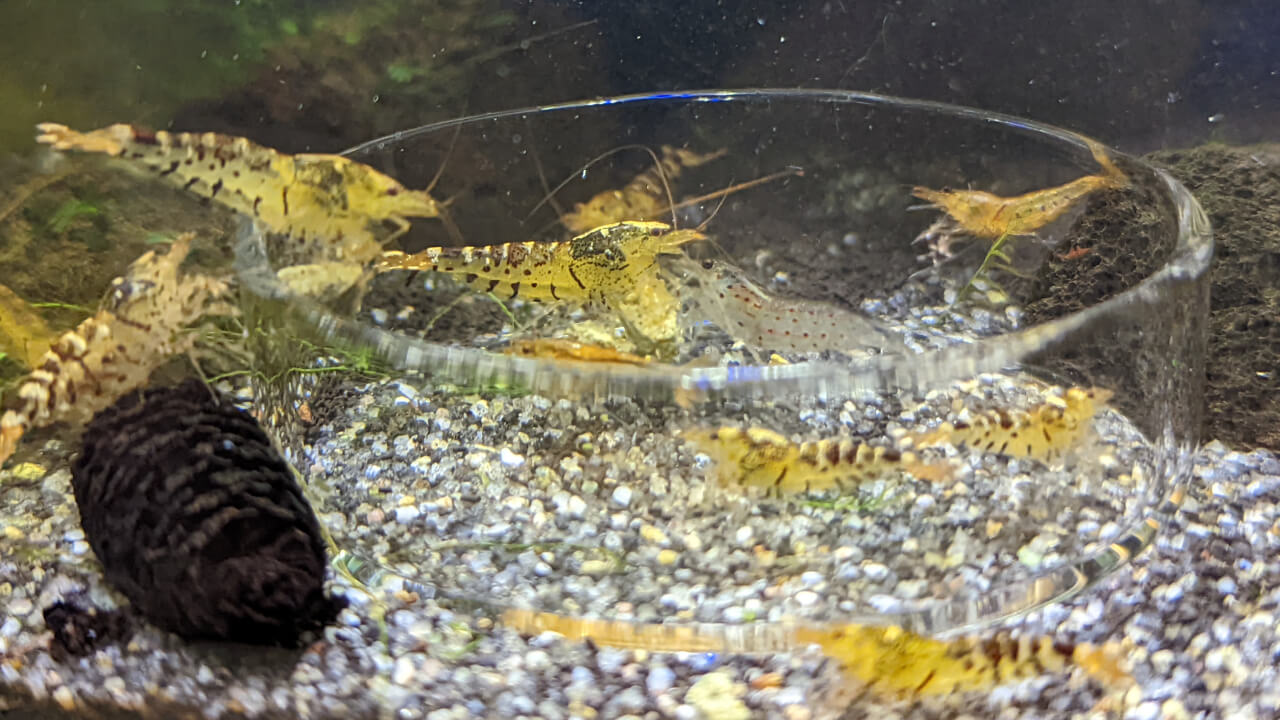
Inspect your shrimp
You should place your feeding dish in a spot that’s easy to see, preferably near one of your aquarium walls. This will let you get a good look at the majority of your shrimp population and check that everything’s looking healthy.
Some things you might want to look for include:
- Grades, i.e. colours and patterns
- Berried females
- Signs of diseases or fungus
- Signs of molting problems, e.g. white ring of death
- Population size
When breeding shrimp to try and improve their grades, it’s very useful to be able to see most of the tank’s population at once. You’ll be able to spot any shrimp with weaker colours next to their brighter coloured neighbours and plan a move to the cull tank.
Drawing all the shrimp to a clear viewing point lets you get a good look at their abdomens. You might find some berried females carrying eggs under the bodies, which is generally a sign of a healthy tank.
Unfortunately, you may also find symptoms of disease and fungus, such as Ellobiopsidae, also known as Green Fungus. This is sometimes confused with eggs by beginner shrimp keepers. If you do see any worrying signs, you should try to quarantine that shrimp as soon as possible while you investigate further.
Keep an eye out for any of the common molting problems too, such as white ring of death. This shows up as a white or transparent ring around the shrimp’s body, just behind their head. If you start seeing shrimp with this white ring, check the GH (General Hardness) and KH (Karbonate Hardness) levels of your water are optimal.
It’s nice to have a rough idea of the size of your colony, too. You don’t need to sit and count each and every individual shrimp, just a rough feel is fine. Is your population gradually increasing over time, or has it started to look less busy in the tank?
Maintenance
After each meal, you should remove the feeding dish along with the food. Giving the dish a quick rinse will help to prevent any algae building up on the glass over time.
If you’ve got enough room in your tank, try to move your feeding dish around to spread out the feeding area.
Even with putting their food in the dish, some shrimp will try to run off with their dinner to prevent the others eating it first. This can cause crumbs and leftovers to end up on the substrate over time, and by spreading it out over a larger area it prevents having a single area for bacteria or Planaria to thrive in.
Alternatively, if you like to vacuum your gravel frequently, having the feeding dish in a single area will make it easier to vacuum out most of the leftovers.
What can you use as a feeding dish?
You’ll be able to find glass dishes made specifically for feeding in shrimp tanks on various websites.
However, if you find them too expensive or shipping is difficult, you should be able to go with any small glass dish you can find locally.
A Petri dish or an ashtray are two alternatives that might be easier to get. Definitely make sure that the ashtray is completely clean and safe to use before putting it into your aquariums, though.
Tips for finding a suitable dish
- Preferably made from glass
- Dense enough to sink
- Gives you a clear view inside
- Avoid plastic
- May be too lightweight and float away
- Could also pollute the water, depending on the type of plastic
- Avoid metals
- Could rust or react with the water and affect the water parameters, e.g. copper is highly toxic to shrimp
Tips
Larger dishes can reduce aggression and mess
Some shrimp can be quite possessive and aggressive over food, fighting for what they think is their fair share.
A larger dish will give your shrimp more room to breathe and enjoy their food without fighting a crowd. This also means they’re less likely to run away with their portion to somewhere else in the tank, spreading crumbs and leftovers around.

Make a suction cup pulley
Using a small suction cup and some fishing wire, you’ll be able to raise and lower the feeding dish in the tank without getting your hands too wet.
Try to find a small suction cup so that you’ve still got plenty of room for food. Don’t go too small though if you’re using a heavier glass dish, you don’t want it to fall off halfway.
Use long tweezers
A long pair of aquascaping tweezers are incredibly helpful for multiple jobs in shrimp tanks. One of those cases applies here, as you’ll be able to get the dish into and out of the aquarium without having to get your hands wet.
Slightly bury the dish
Are your shrimp struggling to get into the dish? Burying the dish into the substrate a little will make it a bit easier to climb into.
Don’t bury it so deep that there’s no lip, though, otherwise the shrimp will drag the food out and make a mess over the substrate again.
Try a floating dish
Don’t have much room on your substrate? Try a floating dish instead.
You can find various different clips and suction cup systems for aquariums that will be able to hold up a small food dish.
Getting food into the dish
Lifting the dish out and in
This is the most obvious method. Starting with the dish out of the tank, prepare the food for your shrimp and drop it into the dish, e.g. break up an algae wafer into small pieces.
Tip: Getting the pieces of food wet with some tank water can help prevent them floating away when you put the dish in.
Slowly lower the dish into the tank at a slight angle, this will give you a bit more control over the water that rushes into the dish. Once the middle of the dish has filled with water, carefully move the dish to the substrate and let the shrimp enjoy their meal.
Use a food drop pipe
The basic lifting out and in method works, but sometimes you’ll find the food makes an escape as you lower it into the water, basically making the dish pointless.
A much more reliable method is to get a small piece of PVC pipe, or tubing, that reaches from your substrate to a few inches above your water level. You then simply put one end of the pipe into your aquarium, just above the feeding dish, and then drop your food into the pipe.
The pipe will make sure you can always get the food exactly where you want it, in the dish. You’ll never have to worry about water flow from your filter or moving your hand too quickly this way.