Opae Ula are small red shrimp that can only be found in the wild in the Hawaiian islands. They naturally live in pools near the shore filled with brackish water called anchialine pools.
Opae Ula cannot live in freshwater, and this makes them quite different to most other popular shrimp in the aquarium hobby.
This tutorial will walk you through the process of setting up your own “rock pool” tank perfect for Opae Ula to live in.
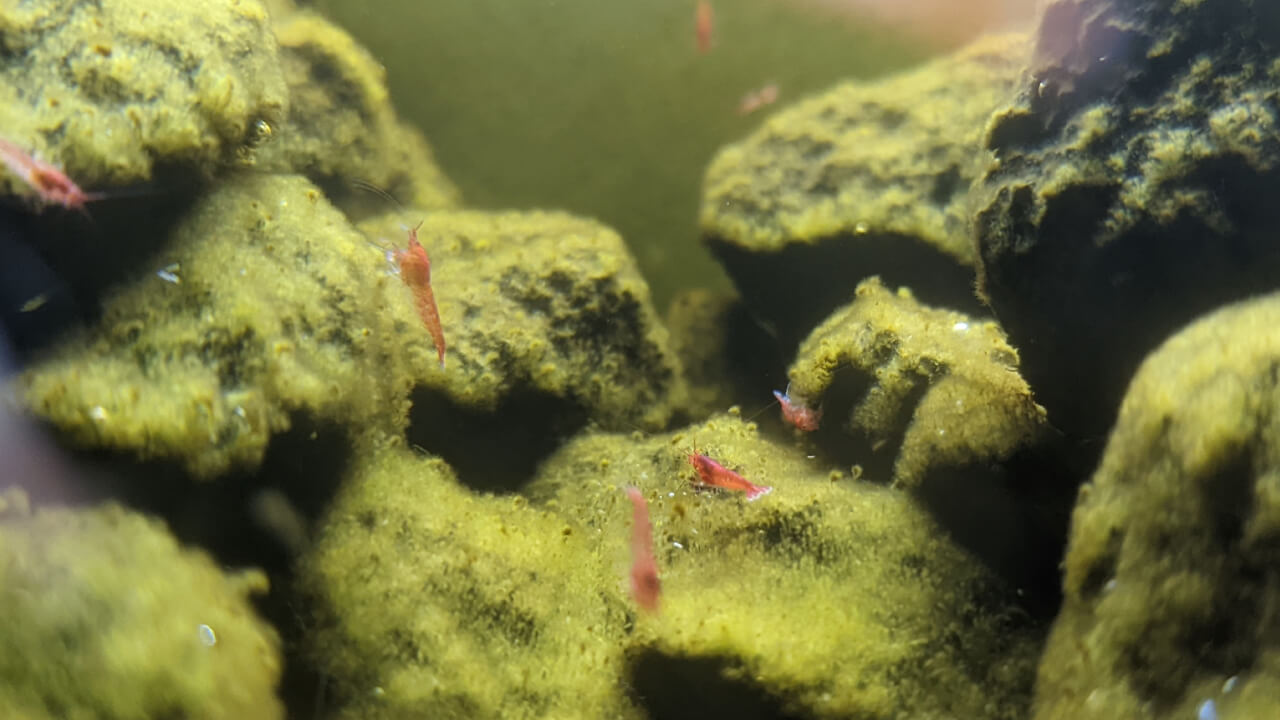
The image below shows a mature tank that’s been setup for over two years, with a healthy population of both Opae Ula and Malaysian Trumpet snails.

Choose a tank
The first important decision to make is what you want to use as your tank.
You don’t have to choose a standard aquarium as they don’t need a lot of space, nor do they require a filter taking up room either. Some Opae Ula setups have been made in tall glass vases, jars, etc.
For this tutorial however, we are using a standard rectangle aquarium that holds 12 liters, but you can choose any tank shape and size you like.
You should also consider where you’re going to position your tank as it’ll influence whether you need to buy a light or aquarium heater. Placing your tank near a window means it’ll get plenty of natural sunlight for growing algae, but also means it’ll more affected by temperature swings based on the weather outside.
Another risk of being near windows is that unwanted pollutants could get into the water and cause harm, such as insects for example.
Required equipment
Hardscape
Choose some hardscape materials that’d look right at home in a brackish pool on a beach in Hawaii.
As Hawaii has quite a few volcanoes and Opae Ula shrimp are also known as volcano shrimp, I decided to use lava rock for my hardscape. The lava rocks were originally all different colours like red, purple, and black, but it didn’t take too long until they were mostly covered in green algae.
Using Ocean rock instead would also be a great choice but do not use “live rock” as the life in the live rock will be expecting marine conditions, not brackish. This can lead to a huge ammonia spike as the rocks inhabitants die off.
In contrast to hardscaping a freshwater shrimp tank, you want to avoid using any wood. The wood will release tannins which lower the pH of the water, but Opae Ula prefer alkali water, usually with a pH over 8.
Sand substrate
Choosing a substrate is entirely up to you. I went with a light sand because I wanted to replicate the rock pool look on a beach.
Try to choose something inert, meaning it won’t react with the water, to keep the tank simple with maintenance and planning.
RO/RODI water
You’ll need either distilled or Reverse Osmosis (RO/RODI) water for mixing the brackish water and for topping off lost water due to evaporation.
You shouldn’t use tap water for marine/brackish water tanks as the contents can vary so much depending on where you live. Your tap water might react with the chemicals/nutrients in the marine salt and cause health issues for the shrimp.
Using pure water such as RODI will ensure the water is safe and consistent.
Reef or marine salt
Find a good quality sea salt mix, like Instant Ocean Sea Salt.
You won’t need to buy much of this as we’ll essentially be mixing our water to half marine strength and Opae Ula are normally kept in small tanks anyway.
Refractometer
A refractometer measures the salinity (salt content) of the water and it’s very easy to learn how to use it. This is an important tool as we’re aiming to mix the water to a specific gravity of between 1.008 - 1.018.

Optional equipment
Light
If your tank is going to get direct natural sunlight during the day you probably don’t need to buy a light specially.
However, if it’s only going to get indirect sunlight or in a fairly dark part of your house, you should definitely look at getting an aquarium light for it. You’ll want to grow a healthy amount of algae in the tank for the shrimp to eat so need a lot of light.
Plug the light into a timer with a schedule of roughly 12 hours on and 12 hours off. If you still struggle to grow algae, you should experiment with changing to something like 16 hours on, 8 hours off.
Heater
A heater is optional for Opae Ula, depending on where in the world you live. They prefer to be kept between 20 - 28°C so if you live somewhere where the winter temperatures cause the room to fall below this range, you should plan on getting an aquarium heater.
Filter
Opae Ula do not require a filter in the tank, they have an absolutely tiny bioload, meaning they produce a very small amount of waste.
Adding one won’t cause any issues, as long as the filter is safe for shrimp, but it’s unnecessary in most cases.
Plan the hardscape
Once you’ve got all the equipment and materials ready, it’s almost time to start building the tank.
Before you add everything into the tank, spend a few minutes planning what you want the rocks to look like. Try to plan a layout that gives the shrimp plenty of hiding places to help them with molting and reduce stress. I wanted to create a rock pool aesthetic so stacked them up around the edge of the tank.

Note that you want to avoid rocks leaning against the glass as it could cause scratches or even break the walls in the worst case.
I also wanted to make sure that the Malaysian Trumpet snails had plenty of room to bury themselves into the sand, so I left an open space in the middle and near the front of the tank.
Think about tank maintenance too before you put everything in place, i.e. make sure you’ve got room to clean algae off the front glass without knocking over all of the rocks.
When you’re ready, add the substrate and hardscape into the tank.
Make brackish water
Read the instructions of your ocean salt product to work out how much you need to use to reach a salinity of between 1.008 - 1.018 sg. Normally this will mean adding about half the recommended amount for marine saltwater that aims for 1.026 sg.
Use a separate container like a jug to mix the water so you can easily see when it’s all dissolved and avoid making a mess with any loose substrate particles like sand.
Ensure you’ve mixed the salt thoroughly and it’s all dissolved into the water before you test it with a refractometer to be confident you’re getting an accurate reading.
Carefully add the brackish water into the tank with your hardscape.
Cycle the tank
You now need to let your new tank cycle and mature for a few weeks before you add any shrimp. If you’ve got a light for the tank, set it up now so that algae can start to grow and give the shrimp plenty of food to eat when they’re added.
Even if you can cycle your tank quickly by using pre-seeded filter media or bacteria in a bottle for example, you should still try to give your tank a few weeks to mature. This gives plenty of time for biofilm to grow, which will make up the vast majority of their diet.
This is also a good time to introduce Malaysian Trumpet snails if you’re planning to add them.

Add the shrimp
When you’re ready to add the shrimp to the tank, you should use the drip acclimate method to give them a smooth transition into their new home.
Before you start the acclimation process though, use your refractometer to measure their water’s current salinity. This will give you some idea of how long you’ll need to acclimate them for. If there’s a large difference in salinity, you should give them much longer to adjust. If instead their current salinity is very close to their new tank’s, you can probably drip acclimate them for just about an hour.

It’s totally normal for your new shrimp to appear quite translucent at this stage, this is their response to stress. They’re trying to be make themselves harder to spot, and they’ll also try to immediately hide in any crevices they can find in the new tank.
Give them a day or so settle in and you should them exploring the tank more and start to get their deeper red colour back again.
Maintenance
The image belows shows the tank after about one year. The population has grown a lot higher than the original ten shrimp that were added, along with a lot more Malaysian Trumpet snails now too.

The algae growth is desirable here, it gives the shrimp a huge amount of natural food to eat and also provides more surface area for biofilm to grow. The algae “vines” can help provide hiding spots for baby shrimp to shelter in too.
Top-off water
Try to refill water lost due to evaporation before you’ve lost around 10%, otherwise the swing in salinity might be too much for the shrimp. The salt and minerals stay in the remaining water as only the water evaporates.
To reduce the amount of top-offs you need to do, especially in warm seasons, you can try to find a loose lid for your container to catch the evaporation and let it drip back into the water.
Water changes
You don’t need to perform regular water changes for Opae Ula tanks, they have a very small bioload so don’t produce a lot of waste.
You should monitor your water parameters for at leas the first few weeks/months to check all the parameters are staying in a healthy range.
If you notice molting problems, then it could be caused by a lack of minerals in the water, this is especially likely if you haven’t done a water change recently. As the shrimp molt they extract calcium from the water in order to form their new exoskeleton, it only requires small amounts but over time the calcium level can drop too low.